Wednesday 13 September 2017

Reduce Side Join

 
A common situation in many companies is that transaction records are kept separate from the customer data. There is, of course, a relationship between the two; usually a transaction record contains the unique ID of the customer through which the sale was performed.

In the Hadoop world, these would be represented by two types of data files: one containing records of the customer IDs and information for transactions, and the other would contain the full data for each customer.

Frequent tasks require reporting that uses data from both these sources; say, for example, we wanted to see the total number of transactions and total value for customer but do not want to associate it with an anonymous ID number, but rather with a name. This may be valuable
when customer service representatives wish to call the most frequent customers—data from the sales records—but want to be able to refer to the person by name and not just a number.


We can perform the report explained in the previous section using a reduce-side join.


/* Mayank  */

import java.io.IOException;

import org.apache.hadoop.conf.Configuration;
import org.apache.hadoop.fs.Path;
import org.apache.hadoop.io.Text;
import org.apache.hadoop.mapreduce.Job;
import org.apache.hadoop.mapreduce.Mapper;
import org.apache.hadoop.mapreduce.Reducer;
import org.apache.hadoop.mapreduce.lib.input.MultipleInputs;
import org.apache.hadoop.mapreduce.lib.input.TextInputFormat;
import org.apache.hadoop.mapreduce.lib.output.FileOutputFormat;

public class ReduceJoin {

    public static class CustsMapper extends
            Mapper<Object, Text, Text, Text> {
        public void map(Object key, Text value, Context context)
                throws IOException, InterruptedException {
            String record = value.toString();
            String[] parts = record.split(",");
            context.write(new Text(parts[0]), new Text("custs\t" + parts[1]));
        }
    }

    public static class TxnsMapper extends
            Mapper<Object, Text, Text, Text> {
        public void map(Object key, Text value, Context context)
                throws IOException, InterruptedException {
            String record = value.toString();
            String[] parts = record.split(",");
            context.write(new Text(parts[2]), new Text("txns\t" + parts[3]));
        }
    }

    public static class ReduceJoinReducer extends
            Reducer<Text, Text, Text, Text> {
        public void reduce(Text key, Iterable<Text> values, Context context)
                throws IOException, InterruptedException {
            String name = "";
            double total = 0.0;
            int count = 0;
            for (Text t : values) {
                String parts[] = t.toString().split("\t");
                if (parts[0].equals("txns")) {
                    count++;
                    total += Float.parseFloat(parts[1]);
                } else if (parts[0].equals("custs")) {
                    name = parts[1];
                }
            }
            String str = String.format("%d\t%f", count, total);
            context.write(new Text(name), new Text(str));
        }
    }

    public static void main(String[] args) throws Exception {
        Configuration conf = new Configuration();
        Job job = new Job(conf, "Reduce-side join");
        job.setJarByClass(ReduceJoin.class);
        job.setReducerClass(ReduceJoinReducer.class);
        job.setOutputKeyClass(Text.class);
        job.setOutputValueClass(Text.class);
       
   
        MultipleInputs.addInputPath(job, new Path(args[0]),TextInputFormat.class, CustsMapper.class);
        MultipleInputs.addInputPath(job, new Path(args[1]),TextInputFormat.class, TxnsMapper.class);
        Path outputPath = new Path(args[2]);
       
       
        FileOutputFormat.setOutputPath(job, outputPath);
        outputPath.getFileSystem(conf).delete(outputPath);
        System.exit(job.waitForCompletion(true) ? 0 : 1);
    }
}

Monday 27 March 2017

Hive Exercise-I


Mail me for Raw data....

These are the steps for performing exercise :


i) Create Database
------------------
create database retail_store;


ii) Select Database
------------------
use retail_store;

iii) Create table for storing transactional records
-------------------------------------------------
create table txn_records(txnno INT, txndate STRING, custno INT, amount DOUBLE, 
category STRING, product STRING, city STRING, state STRING, spendby STRING)
row format delimited
fields terminated by ','
stored as textfile;

iv) Load the data into the table
-------------------------------
LOAD DATA LOCAL INPATH 'txns' OVERWRITE INTO TABLE txn_records;

v) Describing metadata or schema of the table
---------------------------------------------
describe txn_records;

vi) Counting no of records
-------------------------
select count(*) from txn_records;

vii) Counting total spending by category of products
--------------------------------------------------
select category, sum(amount) from txn_records group by category;

viii) 10 customers
--------------------
select custno, sum(amount) from txn_records group by custno limit 10;


Friday 24 March 2017

Hive Introduction (Cont...)

Hive Introduction-2

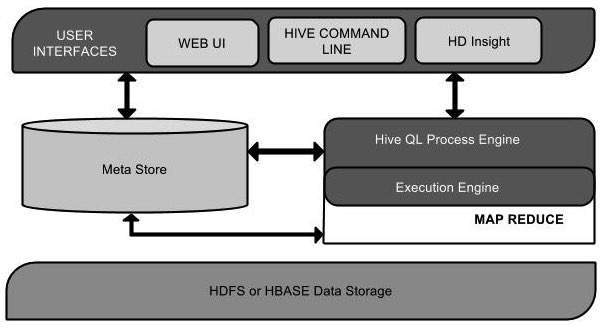
The main components of Hive are:
  • Metastore: It stores all the metadata of Hive. It stores data of data stored in database, tables, columns, etc.
  • Driver: It includes compiler, optimizer and executor used to break down the Hive query language statements.
  • Query compiler: It compiles HiveQL into graph of map reduce tasks.
  • Execution engine: It executes the tasks produces by compiler.
  • Thrift server: It provides an interface to connect to other applications like MySQL, Oracle, Excel, etc. through JDBC/ODBC drivers.
  • Command line interface: It is also called Hive shell. It is used for working with data either interactively or batch data processing.
  • Web Interface: It is a visual structure on Hive used for interaction with data.
Data Storage in Hive:
Hive has different forms of storage options and they include:
  • Metastore: Metastore keeps track of all the metadata of database, tables, columns, datatypes etc. in Hive. It also keeps track of HDFS mapping.
  • Tables: There can be 2 types of tables in Hive. First, normal tables like any other table in database. Second, external tables which are like normal tables except for the deletion part. HDFS mappings are used to create external tables which are pointers to table in HDFS. The difference between the two types of tables is that when the external table is deleted its data is not deleted. Its data is stored in the HDFS whereas in case of normal table the data also gets deleted on deleting the table.
  • Partitions: Partition is slicing of tables that are stored in different subdirectory within a table’s directory. It enhances query performance especially in case of select statements with “WHERE” clause.
  • Buckets: Buckets are hashed partitions and they speed up joins and sampling of data.
Hive vs. RDBMS (Relational database)
Hive and RDBMS are very similar but they have different applications and different schemas that they are based on.
  • RDBMS are built for OLTP (Online transaction processing) that is real time reads and writes in database. They also perform little part of OLAP (online analytical processing).
  • Hive is built for OLAP that is real time reporting of data. Hive does not support inserting into an existing table or updating table data like RDBMS which is an important part of OLTP process. All data is either inserted in new table or overwritten in existing table.
  • RDBMS is based on write schema that means when data is entered in the table it is checked against the schema of table to ensure that it meets the requirements. Thus loading data in RDBMS is slower but reading is very fast.
  • Hive is based on read schema that means data is not checked when it is loaded so data loading is fast but reading is slower.
Hive Query Language (HQL)
HQL is very similar to traditional database. It stores data in tables, where each table consists of columns and each column consists of specific number of rows. Each column has its own data type. Hive supports primitive as well as complex data types. Primitive types like Integer, Bigint, Smallint, Tinyint, Float, Double Boolean, String, and Binary are supported. Complex types include Associative array: map , Structs: struct , and Lists: list .
Data Definition statements (DDL) like create table, alter table, drop table are supported. All these DDL statements can be used on Database, tables, partitions, views, functions, Index, etc. Data Manipulation statements (DML) like load, insert, select and explain are supported. Load is used for taking data from HDFS and moving it into Hive. Insert is used for moving data from one Hive table to another. Select is used for querying data. Explain gives insights into structure of data.

Hive Introduction

Hive is a data warehouse infrastructure tool to process structured data in Hadoop. It resides on top of Hadoop to summarise Big Data, and makes querying and analysing easy.

Hive Architecture


Hive started by facebook......


Hive installation using MySQL on ubuntu

1. Install MySQL
             $ sudo apt-get install mysql-server
             Note: You will be prompted to seta password for root.

2. Install the MySQL Java Connector –
           $ sudo apt-get install libmysql-java

3. Create soft link for connector in Hive lib directory or copy connector jar to lib folder –
           ln -s /usr/share/java/mysql-connector-java.jar $HIVE_HOME/lib/mysql-connector-java.jar
          Note :- HIVE_HOME points to installed hive folder.

4. Create the Initial database schema using the hive-schema-0.14.0.mysql.sql file ( or the file
corresponding to your installed version of Hive) located in the
           $HIVE_HOME/scripts/metastore/upgrade/mysql directory.
           $ mysql -u root -p
           Enter password:


mysql> CREATE DATABASE metastore;
mysql> USE metastore;
mysql> SOURCE $HIVE_HOME/scripts/metastore/upgrade/mysql/hive-schema-0.14.0.mysql.sql;

5. You also need a MySQL user account for Hive to use to access the metastore. It is very important
to prevent this user account from creating or altering tables in the metastore database schema.

        mysql> CREATE USER 'hiveuser'@'%' IDENTIFIED BY 'hivepassword';
        mysql> GRANT all on *.* to 'hiveuser'@localhost identified by 'hivepassword';
        mysql> flush privileges;
        Note : – hiveuser is the ConnectionUserName in hive-site.xml ( As explained next)

6. Create hive-site.xml ( If not already present) in $HIVE_HOME/conf folder with the
configuration below –

<configuration>
<property>
<name>javax.jdo.option.ConnectionURL</name>
<value>jdbc:mysql://localhost/metastore?
createDatabaseIfNotExist=true</value>
<description>metadata is stored in a MySQL server</description>
</property>
<property>
<name>javax.jdo.option.ConnectionDriverName</name>
<value>com.mysql.jdbc.Driver</value>
<description>MySQL JDBC driver class</description>
</property>
<property>
<name>javax.jdo.option.ConnectionUserName</name>
<value>hiveuser</value>
<description>user name for connecting to mysql server</description>
</property>
<property>
<name>javax.jdo.option.ConnectionPassword</name>
<value>hivepassword</value>
<description>password for connecting to mysql server</description>
</property>
<property>
<name>datanucleus.autoCreateSchema</name>
<value>false</value>
<description>Creates necessary schema on a startup if one doesn't exist
</ description>
</property>
</configuration>

7. We are all set now. Start the hive console.

Type hive and enter


For any clarification type in comment and keep update with latest information with www.facebook.com/coebda

Thursday 23 February 2017

Get & Set Method in Salesforce

Getter and setter methods are used to pass data from your visualforce page to your controller and vice versa..

Let's take a very simple scenario... Let's assume you want to display a textbox in your visualforce page.. When the user enters some value in this textbox and clicks on a button you want the value entered by the user in your Apex class (ie. basically your controller or extension)

So go ahead and create a simple visualforce page.. the code for this would be
<apex:page controller="simplegetset">
  <apex:form>
    <apex:outputlabel value="Enter your name here"/>
       <apex:inputtext value="{!userinput}"/>          
  </apex:form>    
</apex:page>


The Apex code for this page would be...

public class simplegetset
{
    public String userinput{get; set;}
}


Now, the variable "userinput" in your Apex class will store the value entered by the user....

Let's analyze the methods now...

Get

The "get" method is used to pass data from your Apex code to your Visualforce page.. In our example we are not passing any value.. hence, when your page loads initially the textbox will have a empty value...

So, lets modify our code and pass a default value to the textbox.. Change the Apex code as follows..

public class simplegetset
{  
    public String userinput;
    public String getuserinput(){return 'John';}
   
    public void setuserinput(String userinput)
    {
        this.userinput = userinput;
    }   
}


You can now see that your page loads with a value 'John'...

Set

The "set" method is used to pass values from your visualforce page to the controller... In our example the variable "userinput" will be storing the value entered in the textbox..

Now modify your VF page as below..

<apex:page controller="simplegetset">
  <apex:form>
    <apex:outputlabel value="Enter your name here"/>
       <apex:inputtext value="{!userinput}">
           <apex:actionsupport event="onclick" rerender="display" />
       </apex:inputtext>                   
    <apex:outputpanel id="display">
        <apex:outputtext value="The name entered is {!userinput}"/>
    </apex:outputpanel>                   
  </apex:form>    
</apex:page>


The Apex code would be...

public class simplegetset
{
    public String userinput{get; set;}
}


In this example what happens is.. the variable "userinput" stores the value entered in visualforce page and passes it to the Apex code.. hence you are able to see the entered value in the visualforce page..

I guess you might understand what i am saying.. to make things simple now use the same visualforce page.. but modify the Apex code as below..

public class simplegetset
{  
    public String userinput;
    public String getuserinput(){return 'John';}
   
    public void setuserinput(String userinput)
    {
        this.userinput = userinput;
    }   
}


Now, whatever value you enter the page always displays "The name entered is John".... This is because your get method always returns 'John'... but still your set method will store the value you entered in the variable "userinput"....


for more update keep visiting 
www.facebook.com/coebda

Monday 20 February 2017

Pig Exercise Part V


        Here I am sharing few exercise that can be helpful for project purpose.
Data analysis can be done by Pig:
Here I am taking weatherData to analysis purpose.

For raw data comment your mail ID in comment section.


----loading and parsing data-----

A = load '/weatherPIG' using TextLoader as (data:chararray);
AF = foreach A generate TRIM(SUBSTRING(data, 6, 14)), TRIM(SUBSTRING(data, 46, 53)), TRIM(SUBSTRING(data, 38, 45));
store AF into '/data9' using PigStorage(',');
S = load '/data9/part-m-00000' using PigStorage(',') as (date:chararray, min:double, max:double);

-------Hot Days------

X = filter S by max > 25;

-------Cold Days------

X = filter S by min < 0;

-------Hottest Day-----

H1 = group S all;     /* puts S's data in H1's Tuple */
I = foreach H1 generate MAX(S.max) as maximum;
X = filter S by max == I.maximum;

-------Coldest Day------

H2 = group S all;
J = foreach H2 generate MIN(S.min) as minimum;
X = filter S by min == J.minimum;

Pig Exercise-Part IV

Here is the exercise for pig language. It is referring to some raw data as it is large in space so it cannot be posted here.

For raw data post your email ID in comment.

A. Load Customer records
========================
cust = load '/input/custs' using PigStorage(',') as (custid:chararray, firstname:chararray, lastname:chararray,age:long,profession:chararray);

B. Select only 100 records
==========================
amt = limit cust 100;
dump amt;

c. Group customer records by profession
=======================================
groupbyprofession = group cust by profession;

D. Count no of customers by profession
======================================
countbyprofession = foreach groupbyprofession generate group, COUNT(cust);
dump countbyprofession;

E. Load transaction records
===========================
txn = load '/input/txns' using PigStorage(',') as(txnid:chararray, date:chararray,custid:chararray,amount:double,category:chararray,product:chararray,city:chararray,state:chararray,type:chararray);

F. Group transactions by customer
=================================
txnbycust = group txn by custid;

G. Sum total amount spent by each customer
==========================================
spendbycust = foreach txnbycust generate group, SUM(txn.amount);

H. Order the customer records beginning from highest spender
============================================================
custorder = order spendbycust by $1 desc;

I. Select only top 100 customers
================================
top100cust = limit custorder 100;

J. Join the transactions with customer details
==============================================
top100join = join top100cust by $0, cust by $0;
describe top100join;

K. Select the required fields from the join for final output
============================================================
top100 = foreach top100join generate $0,$3,$4,$5,$6,$1;
describe top100;

L.Dump the final output
=======================
dump top100;


Update yourself and keep visit
www.facebook.com/coebda

Pig Exercise-part III

Here is Pig programs for wordcount

myinput = load '/sample.txt' as (line);
//TOKENIZE splits the line into a field for each word. 
//flatten will take the collection of records returned by TOKENIZE and
//produce a separate record for each one, calling the single field in the
//record word.

words = foreach myinput generate flatten(TOKENIZE(line)) as word;

grpd = group words by word;

cntd = foreach grpd generate group, COUNT(words);

dump cntd;


Keep updated with

www.facebook.com/coebda

If you need raw data comment here:

Pig Exercise Part-II

Suppose we have 4 column data with field language, website, pagecount and page_size

    en google.com 50 100
    en yahoo.com 60 100
    us google.com 70 100
    en google.com 68 100

and we want


google.com 118
yahoo.com 60 as output.


records = LOAD '/webcount' using PigStorage(' ') as  (projectname:chararray, pagename:chararray, pagecount:int,pagesize:int);

filtered_records = FILTER records by projectname=='en';

grouped_records = GROUP filtered_records by pagename;     

results = FOREACH grouped_records generate group,SUM(filtered_records.pagecount);

sorted_result = ORDER results by $1 desc;

STORE sorted_result INTO '/YOUROUTPUT';


Keep updated with
www.facebook.com/coebda


Pig Exercise-part I

Note the following about bags:
  • A bag can have duplicate tuples.

  • A bag can have tuples with differing numbers of fields. However, if Pig tries to access a field that does not exist, a null value is substituted.

  • A bag can have tuples with fields that have different data types. However, for Pig to effectively process bags, the schema of the tuples within those bags should be the same. For example, if half of the tuples include chararray fields and while the other half include float fields, only half of the tuples will participate in any kind of computation because the chararray fields will be converted to null.


    Bags have two forms: outer bag (or relation) and inner bag.

    Example: Outer Bag
    In this example A is a relation or bag of tuples. You can think of this bag as an outer bag.
     
    A = LOAD 'data' as (f1:int, f2:int, f3;int);
    DUMP A;
    (1,2,3)
    (4,2,1)
    (8,3,4)
    (4,3,3)
     
    Example: Inner Bag
    Now, suppose we group relation A by the first field to form relation X.
    In this example X is a relation or bag of tuples.

    The tuples in relation X have two fields. The first field is type int. The second field is type bag; you can think of this bag as an inner bag.
    X = GROUP A BY f1;
    DUMP X;
    (1,{(1,2,3)})
    (4,{(4,2,1),(4,3,3)})
    (8,{(8,3,4)})


     For more updates visit:
    www.facebook.com/coebda

    For raw data comment here.

Monday 23 January 2017

Patent Concept and Program

public class Patent { 
   
      public static class Map extends
    Mapper<LongWritable, Text, Text, Text> {
       
        //Mapper
       
       
        /*
         *This method takes the input as text data type and and tokenizes input
         * by taking whitespace as delimiter. Now key value pair is made and this key 
         * value pair is passed to reducer.                                             
         * @method_arguments key, value, output, reporter
         * @return void
         */   
       
        //Defining a local variable K of type Text
        Text k= new Text();

         //Defining a local variable v of type Text 
        Text v= new Text(); 


        @Override 
        public void map(LongWritable key, Text value, Context context)
        throws IOException, InterruptedException {


            //Converting the record (single line) to String and storing it in a String variable line
            String line = value.toString(); 

             //StringTokenizer is breaking the record (line) according to the delimiter whitespace
            StringTokenizer tokenizer = new StringTokenizer(line," "); 
 
             //Iterating through all the tokens and forming the key value pair   

            while (tokenizer.hasMoreTokens()) { 

                /* 
                 * The first token is going in jiten, second token in jiten1, third token in jiten,
                 * fourth token in jiten1 and so on.
                 */

                String jiten= tokenizer.nextToken();
                k.set(jiten);
                String jiten1= tokenizer.nextToken();
                v.set(jiten1);

                //Sending to output collector which inturn passes the same to reducer
                context.write(k,v); 
            } 
        } 
    } 


    /*Reducer
     * 
     * Reduce class is static and extends MapReduceBase and implements Reducer 
     * interface having four hadoop generics type Text, Text, Text, IntWritable.
     */
 
    public static class Reduce extends Reducer<Text, Text, Text, IntWritable> {
       
        @Override 
        public void reduce(Text key, Iterable<Text> values, Context context)
        throws IOException, InterruptedException {

            //Defining a local variable sum of type int

            int sum = 0; 

            /*
             * Iterates through all the values available with a key and add them together 
             * and give the final result as the key and sum of its values
             */

            for(Text x : values)
            {
                sum++;
            }
            
            //Dumping the output in context object
            
            context.write(key, new IntWritable(sum)); 
        } 
 
    } 
    
           To keep you update visit:  www.facebook.com/coebda

WordCount Concept

public class WordCount {
   
    public static class Map extends Mapper<LongWritable,Text,Text,IntWritable>{

        public void map(LongWritable key, Text value,
                Context context)
                throws IOException,InterruptedException {
           
            String line = value.toString();
            StringTokenizer tokenizer = new StringTokenizer(line);

            while (tokenizer.hasMoreTokens()) {
                value.set(tokenizer.nextToken());
                context.write(value, new IntWritable(1));
            }
   
           
        }
       
    }
    public static class Reduce extends Reducer<Text,IntWritable,Text,IntWritable>{

        public void reduce(Text key, Iterable<IntWritable> values,
                Context context)
                throws IOException,InterruptedException {
            int sum=0;
            // TODO Auto-generated method stub
            for(IntWritable x: values)
            {
                sum+=x.get();
            }
            context.write(key, new IntWritable(sum));
           
        }
       
    }
    To keep you update visit:  www.facebook.com/coebda

Friday 20 January 2017

Single Node cluster in ubuntu 16.04 with hadoop 2.6.0

Hi All,

Installing hadoop is time taking process. It is not very difficult to understand.
Its installation add beauty in its functionality.

Here are all the steps...Follow all properly.

1. If you are new in ubuntu then need to update whole system by

mayank@mayank-Compaq-510:~$ sudo apt-get update

It will update whole system and fulfill all pending requirement of OS.


2. Need to install java version.

mayank@mayank-Compaq-510:~$ sudo apt-get install default-jdk


 3. Add a dedicated user and group for hadoop functionality.

This step will be useful for configuration of all hadoop supported softwares.

mayank@mayank-Compaq-510:~$ sudo addgroup hadoop

mayank@mayank-Compaq-510:~$  sudo adduser --ingroup hadoop hduser

 This step will create a group to hadoop and add hduser into hadoop group.

At that moment it will ask required details from user:


Adding user `hduser' ...
Adding new user `hduser' (1001) with group `hadoop' ...
Creating home directory `/home/hduser' ...
Copying files from `/etc/skel' ...
Enter new UNIX password:
Retype new UNIX password:
passwd: password updated successfully
Changing the user information for hduser
Enter the new value, or press ENTER for the default
                     Full Name []:
                     Room Number []:
                     Work Phone []:
                     Home Phone []:
                     Other []:
Is the information correct? [Y/n] Y


4.  Installing SSH

Secure Shell (SSH) is a cryptographic network protocol for operating network services securely over an unsecured network.

           ssh has two main components:
  1. ssh : The command we use to connect to remote machines - the client.
  2. sshd : The daemon that is running on the server and allows clients to connect to the server.
The ssh is pre-enabled on Linux, but in order to start sshd daemon, we need to install ssh first. Use this command to do that :


 mayank@mayank-Compaq-510:~$  sudo apt-get install ssh

5. Now need to switch from normal user to hduser.

  mayank@mayank-Compaq-510:~$ su hduser

This will prompt for entering password.

6. hduser@mayank-Compaq-510:/home/mayank$ ssh-keygen -t rsa -P ""

Generating public/private rsa key pair.
Enter file in which to save the key (/home/hduser/.ssh/id_rsa):
Created directory '/home/hduser/.ssh'.
Your identification has been saved in /home/hduser/.ssh/id_rsa.
Your public key has been saved in /home/hduser/.ssh/id_rsa.pub.
The key fingerprint is:
50:6b:f3:fc:0f:32:bf:30:79:c2:41:71:26:cc:7d:e3 hduser@laptop
The key's randomart image is:
+--[ RSA 2048]----+
|        .oo.o    |
|       . .o=. o  |
|      . + .  o . |
|       o =    E  |
|        S +      |
|         . +     |
|          O +    |
|           O o   |
|            o..  |
+-----------------+

 7. Now need to transfer key to authorized key so that it will not ask for password at the time of starting services.

hduser@mayank-Compaq-510:/home/mayank$  cat $HOME/.ssh/id_rsa.pub >> $HOME/.ssh/authorized_keys

we can check it by :

hduser@mayank-Compaq-510:/home/mayank$ ssh localhost

The authenticity of host 'localhost (127.0.0.1)' can't be established.
ECDSA key fingerprint is e1:8b:a0:a5:75:ef:f4:b4:5e:a9:ed:be:64:be:5c:2f.
Are you sure you want to continue connecting (yes/no)? yes
Warning: Permanently added 'localhost' (ECDSA) to the list of known hosts.
Welcome to Ubuntu 16.04.1 LTS (GNU/Linux 3.13.0-40-generic x86_64)
...


8. Install Hadoop

Now system is ready for installing the hadoop. We 

hduser@mayank-Compaq-510:/home/mayank$  wget http://mirrors.sonic.net/apache/hadoop/common/hadoop-2.6.0/hadoop-2.6.0.tar.gz

hduser@mayank-Compaq-510:/home/mayank$ tar xvzf hadoop-2.6.0.tar.gz


 hduser@mayank-Compaq-510:/home/mayank$ sudo mv * /usr/local/hadoop
 [sudo] password for hduser:

hduser is not in the sudoers file. This incident will be reported.

* Note: It may ask to add hduser to group of sudoer list. For that case need to put command after exiting from current username.


hduser@mayank-Compaq-510:/home/mayank$ exit


mayank@mayank-Compaq-510:~$ sudo adduser hduser sudo

[sudo] password for k:
Adding user `hduser' to group `sudo' ...
Adding user hduser to group sudo
Done.


Now, the hduser has root priviledge, we can move the Hadoop installation to the /usr/local/hadoop directory without any problem:

  
mayank@mayank-Compaq-510:~$ sudo su hduser

hduser@mayank-Compaq-510:/home/mayank$ sudo mv * /usr/local/hadoop
hduser@mayank-Compaq-510:/home/mayank$ sudo chown -R hduser:hadoop /usr/local/hadoop


9. Setup Configuration Files

The following files will have to be modified to complete the Hadoop setup:

       i) ~/.bashrc
       ii) /usr/local/hadoop/etc/hadoop/hadoop-env.sh
       iii) /usr/local/hadoop/etc/hadoop/core-site.xml
       iv) /usr/local/hadoop/etc/hadoop/mapred-site.xml.template 
       v) /usr/local/hadoop/etc/hadoop/hdfs-site.xml


 i) ~/.bashrc

Before editing the .bashrc file in our home directory, we need to find the path where Java has been installed to set the JAVA_HOME environment variable using the following command:

This file use to describe system configuration by set up all path. 


Note that path may differ from this one. You need to give same path where java is located.


For that may try "which java"


ii) /usr/local/hadoop/etc/hadoop/hadoop-env.sh


Environment variables that are used in the scripts to run Hadoop.


   iii) /usr/local/hadoop/etc/hadoop/core-site.xml

Configuration settings for Hadoop Core such as I/O settings that are common to HDFS and MapReduce.

The /usr/local/hadoop/etc/hadoop/core-site.xml file contains configuration properties that Hadoop uses when starting up.
This file can be used to override the default settings that Hadoop starts with.


hduser@mayank-Compaq-510:/home/mayank$ sudo mkdir -p /app/hadoop/tmp

hduser@mayank-Compaq-510:/home/mayank$  sudo chown hduser:hadoop /app/hadoop/tmp


 copy paste following line:

<configuration>
 <property>
 <name>hadoop.tmp.dir</name>
 <value>/app/hadoop/tmp</value>
 <description>A base for other temporary directories.</description>
 </property>

 <property>
 <name>fs.default.name</name>
 <value>hdfs://localhost:54310</value>
 <description>The name of the default file system. A URI whose
 scheme and authority determine the FileSystem implementation. The
 uri's scheme determines the config property (fs.SCHEME.impl) naming
 the FileSystem implementation class. The uri's authority is used to
 determine the host, port, etc. for a filesystem.</description>
 </property>
</configuration>


iv) /usr/local/hadoop/etc/hadoop/mapred-site.xml.template 

Configuration settings for MapReduce daemons : the job-tracker and the task-trackers.

By default, the /usr/local/hadoop/etc/hadoop/ folder contains
/usr/local/hadoop/etc/hadoop/mapred-site.xml.template
file which has to be renamed/copied with the name mapred-site.xml:

hduser@mayank-Compaq-510:/home/mayank$ cp /usr/local/hadoop/etc/hadoop/mapred-site.xml.template /usr/local/hadoop/etc/hadoop/mapred-site.xml


The mapred-site.xml file is used to specify which framework is being used for MapReduce.
We need to enter the following content in between the <configuration></configuration> tag:

<configuration>
 <property>
 <name>mapred.job.tracker</name>
 <value>localhost:54311</value>
 <description>The host and port that the MapReduce job tracker runs
 at. If "local", then jobs are run in-process as a single map
 and reduce task.
 </description>
 </property>
</configuration>


v) /usr/local/hadoop/etc/hadoop/hdfs-site.xml

Configuration settings for HDFS daemons, the namenode, the secondary namenode and the data nodes.

The /usr/local/hadoop/etc/hadoop/hdfs-site.xml file needs to be configured for each host in the cluster that is being used.

It is used to specify the directories which will be used as the namenode and the datanode on that host.

Before editing this file, we need to create two directories which will contain the namenode and the datanode for this Hadoop installation.
This can be done using the following commands:

 hduser@mayank-Compaq-510:/home/mayank$ sudo mkdir -p /usr/local/hadoop_store/hdfs/namenode
 hduser@mayank-Compaq-510:/home/mayank$ sudo mkdir -p /usr/local/hadoop_store/hdfs/datanode
 hduser@mayank-Compaq-510:/home/mayank$ sudo chown -R hduser:hadoop /usr/local/hadoop_store


Now open /usr/local/hadoop/etc/hadoop/hdfs-site.xml


<configuration>
 <property>
 <name>dfs.replication</name>
 <value>1</value>
 <description>Default block replication.
 The actual number of replications can be specified when the file is created.
 The default is used if replication is not specified in create time.
 </description>
 </property>
 <property>
 <name>dfs.namenode.name.dir</name>
 <value>file:/usr/local/hadoop_store/hdfs/namenode</value>
 </property>
 <property>
 <name>dfs.datanode.data.dir</name>
 <value>file:/usr/local/hadoop_store/hdfs/datanode</value>
 </property>
</configuration>


Summarization of all configuration files:


 Physically we can check it:


10. Format the New Hadoop Filesystem

Now, the Hadoop file system needs to be formatted so that we can start to use it. The format command should be issued with write permission since it creates current directory
under /usr/local/hadoop_store/hdfs/namenode folder:


hduser@mayank-Compaq-510:/home/mayank$ hadoop namenode -format


Note that hadoop namenode -format command should be executed once before we start using Hadoop.
If this command is executed again after Hadoop has been used, it'll destroy all the data on the Hadoop file system.


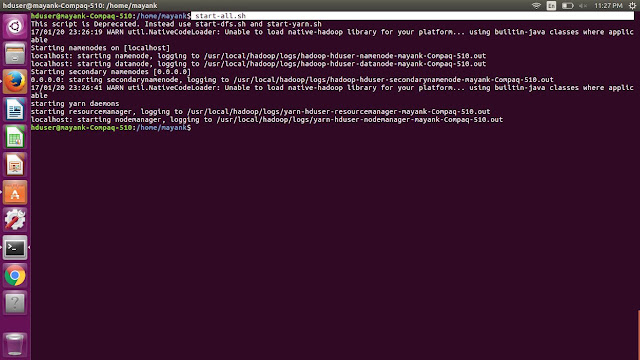
Check all daemons are running:


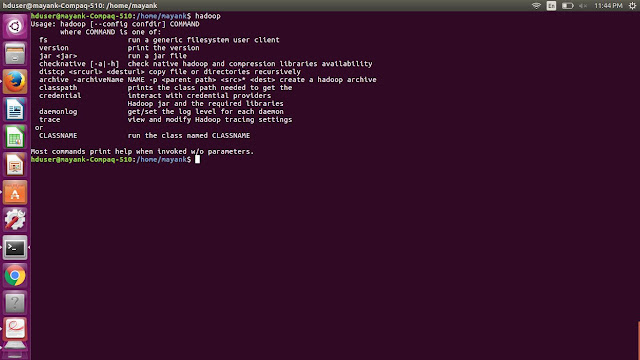
Check hadoop is working or not:


Tuesday 17 January 2017

MapReduce Program for Size count

 Dear All, 

Here i bring you new sizecount program of MapReduce. Hope this will help for all of you. 


public class SizeCount
{
    public static class Map extends MapReduceBase implements Mapper<LongWritable, Text, Text, IntWritable>
    {

       
        public void map(LongWritable key, Text value,OutputCollector<Text, IntWritable> output, Reporter report) throws IOException
        {
            String sentence=value.toString();
            StringTokenizer token=new StringTokenizer(sentence);
            while(token.hasMoreTokens())
            {
               
                value.set(String.valueOf(token.nextToken().length()));
                output.collect(value, new IntWritable(1));
            }
           
           
        }
       
    }
    public static class Reduce extends MapReduceBase implements Reducer<Text, IntWritable, Text, IntWritable>
    {

       
        public void reduce(Text key, Iterator<IntWritable> values,OutputCollector<Text, IntWritable> output, Reporter report)throws IOException
        {
            int sum=0;
            while(values.hasNext())
            {
                sum+=values.next().get();
            }
            output.collect(key, new IntWritable(sum));


        }
       
    }


Keep update by https://www.facebook.com/coebda


Saturday 14 January 2017

Pig Installation on ubuntu 16.04

Need to switch into hduser that is dedicated to hadoop installation

Download Pig into Downloads folder from:
http://redrockdigimark.com/apachemirror/pig/pig-0.16.0/


hduser@mayank-Compaq-510:/home/mayank$ sudo mkdir /usr/lib/pig
hduser@mayank-Compaq-510:/home/mayank$ sudo cp Downloads/pig-0.16.0.tar.gz  /usr/lib/pig/
hduser@mayank-Compaq-510:/home/mayank$ cd /usr/lib/pig/
hduser@mayank-Compaq-510:/home/mayank$ tar -xvf pig-0.16.0.tar.gz
hduser@mayank-Compaq-510:/home/mayank$ gedit ~/.bashrc


Add following in editor:


### Pig Home directory

export PIG_HOME="/usr/lib/pig/pig-0.16.0"
export PIG_CONF_DIR="$PIG_HOME/conf"
export PIG_CLASSPATH="$PIG_CONF_DIR"

export PATH="$PIG_HOME/bin:$PATH"

hduser@mayank-Compaq-510:/home/mayank$ pig -h
 "This command use to check pig availability"


hduser@mayank-Compaq-510:/home/mayank$ pig
17/01/14 21:23:55 INFO pig.ExecTypeProvider: Trying ExecType : LOCAL
17/01/14 21:23:55 INFO pig.ExecTypeProvider: Trying ExecType : MAPREDUCE
17/01/14 21:23:55 INFO pig.ExecTypeProvider: Picked MAPREDUCE as the ExecType
17/01/14 21:23:55 WARN pig.Main: Cannot write to log file: /home/mayank/pig_1484409235225.log
2017-01-14 21:23:55,228 [main] INFO  org.apache.pig.Main - Apache Pig version 0.16.0 (r1746530) compiled Jun 01 2016, 23:10:49
2017-01-14 21:23:55,270 [main] INFO  org.apache.pig.impl.util.Utils - Default bootup file /home/hduser/.pigbootup not found
2017-01-14 21:23:56,350 [main] WARN  org.apache.hadoop.util.NativeCodeLoader - Unable to load native-hadoop library for your platform... using builtin-java classes where applicable
2017-01-14 21:23:56,356 [main] INFO  org.apache.hadoop.conf.Configuration.deprecation - mapred.job.tracker is deprecated. Instead, use mapreduce.jobtracker.address
2017-01-14 21:23:56,356 [main] INFO  org.apache.hadoop.conf.Configuration.deprecation - fs.default.name is deprecated. Instead, use fs.defaultFS
2017-01-14 21:23:56,356 [main] INFO  org.apache.pig.backend.hadoop.executionengine.HExecutionEngine - Connecting to hadoop file system at: hdfs://localhost:54310
2017-01-14 21:23:57,215 [main] INFO  org.apache.pig.backend.hadoop.executionengine.HExecutionEngine - Connecting to map-reduce job tracker at: localhost:54311
2017-01-14 21:23:57,249 [main] INFO  org.apache.pig.PigServer - Pig Script ID for the session: PIG-default-e439e9ab-2054-46e3-9bff-daa870b7450a
2017-01-14 21:23:57,249 [main] WARN  org.apache.pig.PigServer - ATS is disabled since yarn.timeline-service.enabled set to false
grunt>


MapReduce in flow chart

MapReduce Flow